Friday, December 30, 2016

Cookie Delivery Page

Hello and Welcome!

Just got my Christmas photos developed and I am starting the fun of scrapping them! We love baking and we have a tradition of bringing cookie trays to all of our neighbors. Here is the page:


I used the fabulous sketch by the Grand Diva herself for these special photos. I was inspired to used this paper by Bobunny (Silver & Gold) with the dangling ornaments on the deer antlers by the mood photo at Creative Embellishments. The twist at CE is to have something that dangles and I used one of our cookie tag tied on the CE frame with gold thread and bells.


The beautiful Creative Embellishments frame was painted with shimmery Silks paint and coated with white glitter then backed with vellum to help is standout.


The title is also by Creative Embellishments and I jazzed it up with diecut leaves from Verve Stamps and Cranberry Liquid Pearls.


This page is entered in:
              
               big_thumb_a4269a1adcc0676657671ed755bd7edf
-june

Tuesday, December 27, 2016

Getting Inky with Paper Smooches and Quick Quotes

Hello and Happy (almost) New Year!

Today I am creating a New Year's card, but this design could be used for all kinds of occasions. Both my guys (my husband & my son) gave it a big "thumbs up," so I'll probably make a few more.


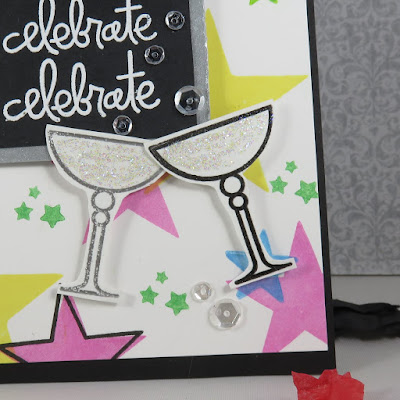
One New Year's resolution I have is to explore techniques with Quick Quotes Powder Puff Inks.Here I overlapped stars from Paper Smooches' Seeing Stars & Circle Of Honor sets using Powder Puff Blue Hawaiian, Pixie Pink, Green Leaf & Limeade (the yellow is by Waffleflower). I saw a similar design with hearts done by Yana Smakula. I love these colors and got great, smooth ink coverage with my first stamping (no Misti needed!).


The festive Paper Smooches' sentiment is from their Hullabaloo set and is heat embossed in white on black cardstock. The toasting glasses are from PS's Hubby & Wifey set and are heat embossed in black & silver. The cups are fulled with super glittery stickles. The sentiment and glasses were adhered with 3L Foam Squares to add dimension. For a finishing touch, clear sequins were added to look like champagne bubbles.


A quick note: Paper Smooches is having their DT Blog Hop this week (Dec. 29-Jan.1) showcasing their new releases. Check it out!


This card is entered in:
 
  • The "Party Time" Monday challenge at Simon Says Stamp

Thanks for stopping by and Happy (almost) New Year!
-june

Sunday, December 25, 2016

Celebrate Transparent Card

Happy Holidays All!

The big day is here. The cards are all sent. The cookie trays delivered to the neighbors. We enjoyed singing carols at church and soon we will be enjoying a feast and sharing gifts. But I thought I'd take a quick break from my board-game playing family to wish you all a happy holiday. This photo card of my 16 year old seemed to express my wish for each of you:


This is a transparency card. I added gold embossed stars, the Papertrey Ink "celebrate" diecut and the Simon Says Stamp sentiment (from their Workout set) to the top layer of the card. The photo is adhered to the inside of the card. I added a white panel on the back of the card behind the photo to add a personal note.

This card is entered in:
  • The "Party Time" Monday challenge at Simon Says Stamp
               Print                              

Celebrate your day,
-june

Friday, December 23, 2016

Skating Santa Card

Hello and Welcome!

I love this set of Workout Santas by Gerda Steiner, they are perfect for invitations to a holiday skating party. Here is a fun one I made with a watercolor background:


This was a fun and easy background to create with watercolors. I just put water on the top half of my watercolor paper, dropped in yellow, blue and purple watercolor paint and, once dry, added snow with a white pen. The silver glitter snowflakes are Elegant Stitched Snowflakes by Memory Box.

This card is entered in:
  • The "Party Time" Monday challenge at Simon Says Stamp

Merry Fitness,
-june

Saturday, December 17, 2016

Being "Negative" at Christmas Time

Hello and Welcome!

To change things up, this card uses mostly negative space in its design. Check it out:


From The Cat's Pajamas snowflake Holiday Duo Tag to the Winnie & Walter Merry Cutaway (backed with Verve's Autumn Blessings leaf stamp) to the green circle background - all use negative space to add depth and interest. For some extra detail I added cheese cloth, stitching, sequins, tiny bells on gold thread, and ribbon. This card is based on a sketch at Your Next Stamp.

Here is a detail:


This card is entered in:
               Print
              

Thanks for stopping by, and maybe give this negative space technique a try.
-june

Friday, December 16, 2016

Good Cheer Coffee Card

Hello and Welcome!

Thought I'd make a quick Christmas card tonight. 


This card came together so fast with The Cat's Pajamas' Cup Duo Die and Verve Stamps' Coffee Helps sentiment stamp.

This card is entered in:
                Winter 2016 Blog Hop
               Print


Thanks for stopping by,
-june

Girl's Coffee Card

Hello and Welcome!

My friend, Sue, and I like to hit the gym and go out for coffee afterwards. Thought this would be a fun card to send her:


The background papers are by Paper Studio and diecut with WPlus9's Sunshine frame die. The Memory Box Delicate Stitched Snowflake was diecut from white glitter paper. The Verve cup and sentiment, which was heat embossed on vellum, are from their Coffee Helps set. The Simon Says Stamp girl, from their Workout set, was colored with Zig Clean Color markers and fussy cut.

This card is entered in:
               Winter 2016 Blog Hop
              
              
Thanks for stopping by and stay warm (it's going to be -20 F here this weekend),
-june

Thursday, December 15, 2016

Merry Fitness Card

Hello and Welcome!

It is getting down to the wire and I'm trying to finish my Christmas cards. I could sure use another week. (I seem to say this every year at this time.) This card is for one of my Jazzercise teachers. Can't wait to give it to her tomorrow.


The background was created with Simon Says Stamps' Falling Stars stencil and Dreamweavers gold paste. The Memory Box Delicate Stitched Snowflakes were diecut from silver metallic paper. The Gerda Steiner sentiment (from the Sporty Santa set) was heat embossed on vellum. The Simon Says Stamp girl, from their Workout set, was colored with Zig Clean Color markers and fussy cut.

This card is entered in:
  • MarkerPop! Challenge #110 "Winter"

Thanks for stopping by and hope you are enjoying the holidays,
-june

Tuesday, December 13, 2016

Inked Vellum Card

Hello and Welcome!

Today's card involves vellum, CAS-ual Friday stamps & die, and Quick Quotes' Powder Puff Inks plus glittery embossing powders. So much fun! Check it out:


This technique was fairly easy and the results are AMAZING! I started by stamping CAS-ual Fridays' pine branch (Pine Cone stamp set) with Versamark on vellum and heat embossed it with shiny Pearl green embossing powder. Next I stamped the snowflakes & heat embossed them with Ranger's Tinsel embossing powder. This powder is white with silver glitter in it. Next, on the back of the vellum I smeared Quick Quote's Blue Moon, Blue Hawaiian &  Hydrangea Powder Puff Inks directly from the pad. It looks translucent, almost like it is glowing.

The sentiment and scalloped frame, both from CAS-ual Fridays, were attached to a Memory Box snowflake cut from white glitter paper and pop dotted. The vellum was attached to a white card base with Tombow Mono liquid adhesive, which I positioned on spots behind the banches to hide it.

This card is entered in:


Thanks for stopping by and give this technique a try,
-june

Saturday, December 10, 2016

Kitty Celebrate Tag

Hello and Welcome!

It is my son's girlfriend's birthday today. He has been planning a surprise party for her for weeks. We just got the call from him that he pulled off surprise party #1 at the restaurant with all her friends - she was thrilled. This was my husband's & my cue to sneak over to his house and decorate it for party #2, which includes cake, flowers and gifts. Of course, I had to make a special tag to go on gift we got her, and here it is:


I was playing around with my Quick Quote Powder Puff Inks and found they work a lot like Distress Inks. This is so exciting, I can't wait to try a bunch of techniques with them! My first experiment was to use the inks as watercolors. I stamped Powder Puff Inks on an acrylic block. Then, using them like watercolor paints, I colored the cute Gerda Steiner Caroling Cat stamp (stamped with Versafine ink). I am thrilled with the results!


This tag was inspired by Kay Miller's tag on Day 2 of Ellen Hutson's 12 Days Of Christmas Tags. I used The Cat's Pajama's Cup Duo die, Lawn Fawn's Stitched Ornament & Snowflake dies, and all of the pattern paper are Quick Quote Urban Oasis & Whistlin' Dixie lines.

This tag is entered in:

               Winter 2016 Blog Hop


Thanks for stopping by, and hope you have a few wonderful surprises today!
-june

Friday, December 9, 2016

Skating Santa Card

Hello and Welcome!

Have you ever made a card that turned out better than you expected? I get so excited when this happens, it really is one of the best feelings. Well, that is what happened with this card, check it out:


I started by coloring Gerda Steiner's skating Santa (Winter Sport Santa set) with Zig Clean Color markers and fussy cutting. Then, on mirrored paper, I stamped My Favorite Things sentiment (Trim A Tree set) with Stazon. The mirrored paper look so much like ice. The background is snowflakes on teal glitter paper. This card really came together with MFT's card sketch. The fun scallop design is from MFT's Trim A Tree also and was heat embossed with white powder. It was finished off with clear sequins and tiny gems.

I am really looking forward to giving this card to one of my Jazzercise instructors.

This card is entered in:


Thanks for stopping by and hope your projects come out extra special too,
-june

Tuesday, December 6, 2016

Minnesota Layout

Hello and Welcome!

There is a blizzard outside today, so what better time to scrap and remember the glorious weather of summer. I feel warmer already! Truthfully, I also enjoy these crazy winter days, as I feel no guilt staying home and scrapping all day. Here is my tribute to my wonderful state:


This page features the beautiful blue and gray papers of Serendipity by Quick Quotes Scrapbooking Co. I used Quick Quotes' Midnight Confessions Powder Puff Ink to edge all of the papers and give them depth. The journaling is in a Quick Quote chipboard frame that was colored with Feather Gray Powder Puff Ink. The flowers were fussy cut from the QQ pattern paper and Viva Silver Perlenpen dimensional paint was added. Here are a few details:


I finished off this page, based on a sketch by My Creative Sketches, with Thickers for the title, a state diecut and silver thread.

This page is entered in:
              

Thanks for stopping by and stay warm,
-june

Monday, December 5, 2016

Exciting SOS News

Hello and Welcome!

Happy Monday! I've got a bit of exciting news to start the week. 

Scrap Our Stash Challenge
Scrap Our Stash, the super fun layout challenge site, has chosen me as one of their new Design Team members!!!  You can check out the announcement on their blog here.

I have been a huge fan and playing in their challenges for years. SOS is great as they host two monthly challenges and offer daily inspiration designed to help you use up your stash.

This was the first time I had applied to be a DT member. But seeing how fun the Scrap Our Stash Challenges are and how well run the site is, I just wanted to be a part of it! And now starting in January I will be!

In the meantime, go check out the site for some fun inspiration and maybe even give one of the challenges a try.

Thanks for sharing my happy news and for stopping by,
-june

Sunday, December 4, 2016

16 Enjoy the Ride Card

Hello and Welcome!

Today is my son's 16th birthday. It's a BIG one as he is really looking forward to getting his driver's license. He is scheduled for his test in 3 weeks, and then look out world! To celebrate his birthday I wanted to make him a special card that captures the fun and freedom driving offers. This is the card:


I recently ordered the "Joyride" stamp set from The Cat's Pajamas knowing that I would be making many cards featuring a driving theme. The set is FABULOUS! It was so fun making this card. The bunny & bike are colored with Copic markers and Glossy Accents was added on the motorcycle's mirrors and lights. The sentiment is from the same set. The big numbers are from The Cat's Pajamas' Number Plate Cutup. The pine tree is a Tim Holtz diecut. The pretty stitched border was made with Simon Says Stamps' Bundle Of Stitched Shapes diecut. The background was make with chalk inked snowflakes and clear sequins.

This card is entered in:
               tcptuesday328

Thanks for sharing this fun evening with me,
-june


Saturday, December 3, 2016

Hey! Happy Holidays Tag

Hello and Welcome!

Things are really getting busy with the holidays upon us. There is also a lot of great inspiration for fun crafting projects. Handmade tags are very trendy and Ellen Hutson is having the 12 Tags of Christmas with a Feminine Twist 2016 challenge in December. Here is my first entry:


This tag will also be entered in Ellen Hutson's Mix It Up challenge, combining her products and Art Impressions. Laurel did a fabulous tag on Day 1 with a step-by-step tutorial making a similar tag. I was so inspired, I just had to follow along. I used mostly the same products as Laurel, except the sentiment "Hey!" is from Ellen Hutson's All Inside stamp set and the owl is Art Impressions' Whoots. Following the Color Challenge, I used Copic markers to color the images. Other products include: Lawn Fawn ornament die, white Liquid Applique, black Glaze Pen, and Wink Of Stella.

This tag is entered in:

Thanks for stopping by,
-june


Tuesday, November 29, 2016

Happy Holidays Card

Hello and Welcome!

With the holidays upon us, it is time to get Christmas cards ready to be mailed! Here is my latest one:


The cute puppy image is by Gerda Steiner Designs, and was colored with Zig Clean Color markers. The sentiment is also by Gerda Steiner. The Snow Scribble frame is by Poppy Stamps. The background stars are a Winnie & Walter stencil, colored with Distress ink.

This card is entered in:

Happy holidays!
-June

Sunday, November 27, 2016

Fast Pages with Quick Quotes and Stuck?!

Hello and Welcome!

It's fun playing around with paper and embellishments, but sometimes you need to get pages DONE. Right now I've got dozens of summer photos I really want to scrap, but the holidays are upon us and it's snowing! So, it is time to get a bunch done and in the book.

Ideally, I want to get pages done quickly, but still have them look great and enjoy the process. Here is my step-by-step on how the achieve this feat creating this page:


First, I gather the basics - photos, a favorite paper collection, a few embellishments, and a sketch. One of the paper lines I like to work with is Quick Quotes pattern papers, because they are designed to enhance photos, not compete with them. It is a big time saver for me when I don't have to "fight" the paper. Today I will be using Quick Quotes Whistlin' Dixie line.


Also, by using a sketch, a lot of the design work is already done for you. It is just a matter of putting it together, another big time saver. Today I am using a Stuck?! sketch - there are many fabulous free designs available in the Stuck?! Sketches archives.


Next, use white (or kraft) paper as your 12x12 base. It looks good with almost all photos and pattern papers, and it is one less thing to think about. Then, create the "top" layer that holds your photos. This saves me time as now I only have one element, instead of several photos & papers, to handle. Plus, I can set it aside so I don't get goop on my pictures.

Design Tip:
  When photos are dark, mat them with a white boarder. It brightens them up and helps them stand out.


Add the pattern papers, following the sketch design. I chalked all of the paper's edges with QQ's Feather Gray Powder Puff Ink. I used Creative Embellishment's brick chipboard for the decorative edge to add some texture.


The title and journaling were created on Quick Quotes Whistlin' Dixie strips with hand written text, both big time savers. I ripped several edges, which adds texture. It also keeps you from having to worry about keeping everything square and straight - another big time saver if you're a perfectionist like me.

Design Tip:
  When using photo and papers with lots of different colors, incorporating striped pattern paper with those colors (as I did in the title area) ties everything together.

Design Tip:
  Large plain background areas can draw your eye away from the photos. In this case, I added gray background stamping to break up the white background.


I finished up the page with chipboard embellishments by Creative Embellishments including the column, leaves, apple & butterfly. Some were colored with QQ's Powder Puff Inks. For interest, DCWV cork and silver thread were added by the journaling.


Hope you find these ideas helpful for getting your pages done fun, fast and fabulously!

This page is entered in:
               
                big_thumb_44a418de5658b64b61356cd49a6f83c7
  • The "Trio-Tastic" Monday challenge at Simon Says Stamp - I used three photos

Thanks for stopping by and happy scrapping,
-june