Tuesday, August 29, 2017

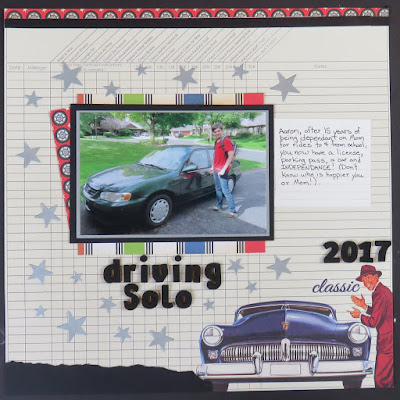
Driving Solo Layout

Hello and Welcome!

I have been driving Aaron to and from school for 15 years (if you include preschool), but this year he has a license, a parking permit and a car! I don't know who is happier, Aaron or me, with this new independence!


I used Authentique (Dapper) and Carta Bella (Cartopia) pattern papers. The metallic silver stars were diecut with Simon Say Stamps' Large Holiday Shapes. I used Thickers for the title. This page is based on a sketch from Let's Get Sketchy and I was inspired by the colors and car on the mood board.

This page is entered in:


Thanks for stopping by,
-june

Saturday, August 26, 2017

Welcome Back Card

Hello and Welcome!

With my son starting school soon, I thought it would be nice to slip a card into his lunch bag on the first day.


The card was made with Pink & Main's Happy Fall stamp set. I colored their cute owl and apple with Zig Clean Color markers. The pattern papers are Pink & Main's Shades Of Spring collection and DCWV's School Time. I don't have a good "back to school sentiment, so I used this one from Paper Smooches.This card was inspired by a sketch at Sketch n' Scrap.

This card is entered in:


Thanks for stopping by,
-june

Minnesota Zoo Layout

Hello and Welcome!

Aaron seems to have hit it off with this cute little penguin at the Minnesota Zoo. It is amazing how close you can get to the animals. There were no barriers, just lots of zookeepers, between us and the kangaroos.


This page came together easily with these great papers by Graphic 45 and the fun Stuck?! sketch.

This page is entered in:
              

Thanks for stopping by,
=june

Friday, August 25, 2017

Giddy Up Layout

Hello and Welcome!

I grew up on a hobby farm and had my own horses. My guys also enjoy horses, so we look for any excuse to head out for a trail ride. Here we are down in Stewartville, MN.


I love the Graphic 45 horse paper and wanted to show it off as well as the photos. By just adding a little twine to this page it came together really fast and it looks fabulous!


This page is entered in:

Thanks for stopping by,
-june

Thursday, August 24, 2017

Fun, Fast and Fabulous Layout with Quick Quotes

Hello and Welcome!

Today I am up on the Quick Quotes blog and, keeping with the school theme this week, here is a layout of my son jumping for joy at the end of the school year.


This layout was super fun and easy to put together:
  • punch 18 2.5" circles from Mulberry pattern papers and cut in half
  • edge each half circle with Coal Miner PowderPuff Chalking ink
  • place 5 half circles along each of the edges of Windsong103
  • sew around the border (optional)
 
  • tuck in 4 half circles under the first layer along each edge
  • mat photo with black cardstock
  • cut and adhere title and embellishments from Mulberry Quotes & Phrases
  • add journaling
Quick Quotes Products: 
Mulberry Paper Pack
Mulberry Quotes & Phrases
Windsong Paper Pack
PowderPuff Chalking Ink: Coal Miner

If you would like to see more ideas with Quick Quotes products, visit their blog here. Thanks for stopping by,
-june

TV Stars With Scrap Our Stash

Hello and Welcome!

Today I'm sharing a fun layout about our "live studio audience" TV adventure!


When I saw the Scrap Our Stash sketch, I right away thought of using journaling cards. I have stacks of them. They worked great, although I did adjust the sketch orientation. I also added a large circle in the background to look like a big camera lens.


The Elle's Studio TV themed products were perfect for this page.


For the fun "TRAVEL" word challenge I used:
T - TV embellishments
R - Red or film strip Ribbon
A - Acrylic stars
V - Vellum
E - Elle's Studio
L - Letter stickers


This page is entered in:

Thanks for stopping by,
-june

Wednesday, August 23, 2017

Robotics Banquet Layout

Hello and Welcome!

Aaron was the Marketing Lead for the EP High School Robotics Team. He put together a group of students that contacted sponsors, started a grant writing program, created the monthly sponsor newsletter, organized corporate presentations, and so much more. At the end of the season banquet, Aaron gave out thank you plaques to the sponsors (including his favorites Mark Weber (EP Community Foundation grant), Greg Young (Metro Storage & cheerleader) and Jeff  (Dad)). Aaron also received his High School Letter. It's hard to believe he was only a Sophomore this year!


This page was created with several Kaisercraft lines including the Rewind, Technologic and Off The Wall collections. I love how you can mix and match Kaiser's products with wonderful results.


I added silver embossing paste with a gear stencil and engineering themed stamped around the circle base.


The diecut gears were cut from Kaiser papers. Kaiser makes such great masculine lines.

This page is entered in:

Thanks for stopping by,
-june

Tuesday, August 15, 2017

Mixing It Up With Quick Quotes

Hello and Welcome!
Today I am up on the Quick Quotes blog mixing several different collections of their papers. One of the great things about Quick Quotes papers is that many of the paper lines mix and match beautifully.


This page is about an event that I look forward to all year long - The Stamp And Scrapbook Expo! (and yes, that is LeeAnn and Lorraine from the Expo blog.) The staff is great, the products are great and it is such great fun! You can even get Quick Quotes products and take fabulous Quick Quotes classes there!

On this layout I mixed and matched Serenade (pink), Whistlin' Dixie (yellow & teal dots), 49 Shades Of Grey (grey dots) and Windsong (white) lines. Edging all of the papers with Coal Miner PowderPuff Chalking ink really tied it all together.


I was inspired by a layout by Melissa Ullmann which had a "cut file look" with the flower border. I simulated the look with punches. I love how it turned out.


The flowers were made with both the A and B sides of each of the Quick Quotes papers. I also added a little machine stitching.


Quick Quotes Products:
Serenade Collection (coming soon)
Whistin' Dixie 106 &107
49 Shades Of Grey 101
Windsong Paper Pack
PowderPuff Chalking Ink: Coal Miner

Thanks for stopping by,
-june

Thursday, August 10, 2017

High In The Sky with Scrap Our Stash


Hello and Welcome!

My son and husband rode the clickity-clackity 1960's Gateway Arch elevator all the way to the top! It was a slow, claustrophobic ride, but worth it!


This page is my Design Team project for Scrap Our Stash's August Tic-Tac-Toe Challenge:

No automatic alt text available.

I used the top row: Map - Simple Stories - Stick pin. (I knew that my map washi tape and lettered stick pin set would come in handy someday.)  Hop on over to the SOS blog and check it out!


To create the cute, colorful circle clouds, I punched several sizes of circles from Simple Stories paper. glued them on a thin strip of paper and trimmed off the bottom. Paige Evans showed this technique on the Weekly Scrapper site. You can see her video here. I also diecut vellum clouds from a My Favorite Things die.


This page is entered in:
  • The "For a Child" Wednesday challenge at Simon Says Stamp

Thanks for stopping by,
-june

Friday, August 4, 2017

Quick Quotes Friday Challenge 78

Hello and welcome! 

It is the first Friday of the month and that means it is time for Quick Quotes' August Challenge. I am hosting Challenge 78 and the theme is... Use Colored Inks!

I LOVE Quick Quotes' PowderPuff Chalking Inks. They come in so many beautiful colors and are so versatile.  Here is my project with lots of ways to use these inks.


Technique #1 - Using Bora Bora PowderPuff Chalking Ink, I tinted white glass bead texture gel and applied it to Quick Quotes' Anchors Aweigh 100 paper with a swirly stencil. I found this works best by stamping the ink onto a craft mat and then mixing the texture gel into it.


Technique #2 - I used Bora Bora and Sky Blue PowderPuff Chalking Inks to color white ribbon. This was quite easy - just run the ink pad over the ribbon to color it. For more on this technique, check out this video tutorial, Customize Your Ribbon with PowderPuff Chalk Ink with Barb. (There are lots of other great techniques in the Tutorial section of the Quick Quotes blog, too, so be sure to check them out!)


Technique #3 - I colored my chipboard flowers with Bora Bora and Sunset PowderPuff Chalking Inks using a smooshing technique. Just "smoosh" the chipboard onto the ink pad for a beautiful result!


Technique #4 - Two-tone letters are all the rage right now. I used Sky Blue and Sunset PowderPuff Chalking Inks to create my own two-tone title in exactly the colors I wanted. I started with white Thickers, masked one half with washi tape, and applied the first color. After they dried, I moved the mask to the opposite side and colored the other half with the second color. Just for fun, I also added Glossy Accents. (The "2017" are unaltered numbers from the same set.)


Technique #5 - I used Bora Bora, Sky Blue, Sunset, and Slate PowerPuff Chalking Inks to edge the papers and embellishments for my page. It makes them really pop!


These are just a few of the techniques you can do. PowderPuff Chalking Inks also work great for stamping, blending, watercoloring, and so much more.


I used my Canon Selphy CP1200 to print the photo. So easy and convenient!


Here are some close ups of the finished product.


Quick Quotes Products:
Anchors Aweigh: 100, 101, 102, 109
Anchors Aweigh: Chipboard Die Cuts
PowderPuff Chalking Inks: Bora Bora, Sky Blue, Sunset, and Slate

Canon Printer:
Cannon SELPHY CP1200

We hope you are inspired to join this month's Quick Quotes' Colored Ink challenge, you can link up here. I can't wait to see what you create!!!
-june