Monday, November 30, 2015

Cheeky Hummer


Hello and Welcome!

With the snow piling up outside, I needed to remember this warm summer afternoon with the flowers and birds. Here is a fun mixed media project:
  I had been waiting to scrap this page until my new Hummingbird stamp from Designs By Ryn came. Isn't it beautiful. I colored my bird images with Zig Clean Brush markers. I also used my wonderful new Creative Embellishments chipboard frame and leaves. These embellishments really make a good page great. I colored the leaves with Inka gold in copper, gold & green. The paper is by Bobunny. The letters are by Lush. And the swirly green vines are a die by Cheery Lynn. This page is based on a sketch by Rochelle Spears at Sketches in Thyme (see link below).

This layout is entered in the following contests:

Sunday, November 29, 2015

Merry Christmas Card

Hello and Welcome! (This is my second post of the day, scroll down to see my layout.)

Just got my order from Winnie & Walter and had to play with the Happiest of Holidays stamp set and Merry die. This card is based on one by Shay at the Rerun challenge (see link below).
I stamped the background with the holly for the W&W Happiest Of Holidays stamp set with versafine green ink, colored them with copic markers and added red Stickles. I then cut the panel with a Simon Says Stamp stitched rectangle die (Bundle Of Stitched Shapes) and glued it to a white card front.  I embossed Sweet Stamps vellum with a Tim Holtz folder and glued that on top. I created the wreath with The Cat's Pajamas stamp, Ranger gold embossing and colored it with copic markers. I cut the W&W "Merry" die from Doodlebug glitter paper and added 3 more white die cuts behind it for depth. The W&W stamped bird is also colored with copic markers and pop dotted. The Christmas sentiment is by Hero Arts. I then glue the wreath panel on the vellum.

This card is entered in the following contests:


Robots Invade State Fair


Hello and Welcome

As you can tell we love going to our Minnesota State fair and we love robotics! So what could be better than combining them.

I used MAMBI & American Crafts papers and stenciled (Crafter's Workshop) the gears with Hickory Smoke distress ink. I based this page on a sketch at Stuck?! sketches and used Creative Embellishments chipboard accents and real metal washer from my husbands tool stash. The title are letters by Recollections and Basic Grey. I also used a silver Uniball pen to accent different areas.


This layout is entered in the following contests:

Saturday, November 28, 2015

The Amazing Race


Hello and Welcome!!

This maybe one of the more unusual "anything goes" entries. Over Thanksgiving break my husband and son are creating an audition video for The Amazing Race TV show. They needed me to make an envelope similar to the one they use on the show. After a moments thought I remembered my Cheery Lynn "Amazing" die!


So here it is in action!!!


Stay tuned, if the guys make it, I'll keep you all informed so you can root for them. Good luck Jeff and Ty.

Entered in the following contests:

Friday, November 27, 2015

Merry Christmas Tag


Hello and welcome!

This tag is so sparkly you need sunglasses in real life. I used Doodlebug's glitter paper for the tag and the trees. The trees are a die by Memory Box and I inlaid the green pieces. The snowflakes are by Lawn Fawn, the hole reinforcement is by Waffle Flower and the sentiment is by Hero Arts. The gems are by Hero Arts. I was inspired by Ardyth's tag at at the Muse Christmas Vision with her bright colors, green ribbon & reinforcement and the tree & tag shape.


This tag is entered in the following contests:

Wednesday, November 25, 2015

Celebrate Christmas Tag


Hello and Welcome!  (Second post today, scroll down to see the Waffle Flower tag.)

I am having so much fun creating tags for the 25 Days of Christmas Tags (inmycreativeopinion.blogspot.ca). It feels so good to be getting these none well before the big rush. Thank you Tracey!!! Here is another tag I made this time using Avery Elle's Hip Hip Hooray stamp set. It is a birthday themed set, but with a little masking and some creative twists - tada - it's Christmas.
  I used Zig Clean Brush markers to color the images and distress inks & masking to make the background. I added Wink of Stella to the snow and star for some sparkle. I also added white gel pen to the water sprinkles in the background for a dimensional bohek effect. This tag was inspired by Jean Manis's creation on Day 1 of the Tracey's tag challenge.
  I will be giving this tag with the poinsettia to our vet when I bring our kitties in next week.


This tag is entered in the following contests:

Christmas Joy Tag

Hello and Welcome!!
  I love making holiday tags. They are so quick and fun. This tag is entered in Waffle Flower's Masking Challenge. There is just something magical about masking. It opens up limitless possibilities. I used Waffle Flower's DT Mix stamp set and by masking off the roses and leaves, I was able to create this pretty wreath in no time.

  I used Zig Clean Brush Markers to color the images. I will be giving this tag along with some cookies to our mailman. This tag was inspired by Laura Jane's tag on Day 23 of The 25 Days of Christmas Tags challenge.

This tag is entered in the following contests:

Monday, November 23, 2015

Sassy Winter Tag

Tracey Mcneely is hosting a really fun and creative Christmas tag making event over at her blog inmycreativeopinion.blogspot.ca. Also, Sweet N Sassy stamps is celebrating their 8th birthday this month with all kinds of specials (sweetnsassystamps.blogspot.com). Plus Sugar Pea Designs is doing a Home For The Holidays. They are all doing  challenges and here is my entry:

I used Sweet N Sassy stamps, Simon Says Stamps die and sequins and colored it with Zig Clean Brush Markers.

This tag is entered in the following contests:

Sunday, November 22, 2015

Thank You So Very Much Card


 Thanks for stopping by this weekend. Here is a fun card with a great technique.

This card follows an interesting technique of geometric stamping. There is a great how-to video by Papertrey Ink's Make It Monday post (see below). I used Papertrey Delightful Dahlia stamps. I think it has a strong Scandinavian feel. I stamped with versamark and used Stampendous gold embossing powder and color the images with Zig Clean Brush markers and a waterbrush on Ranger watercolor paper. I finished it off with square green gems and gold embossed strips. 

This card is entered in the following challenges:

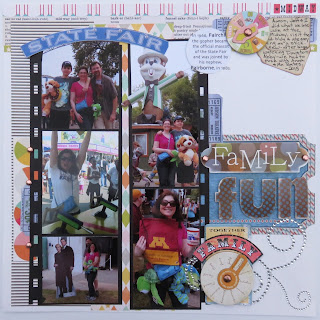
Family Fun Layout

Thanks for stopping in this weekend. Here is a layout I created for the Scrappy Friends challenge.  This layout is based on Brenda's sketch.


This page is entered in the following challenges:

Wednesday, November 18, 2015

Amazing Summer Layout

Thanks for stopping in.
I have been enjoying making cards and playing with TCP's new release for the last 2 weeks (they truly are the nicest people), but I have been dying to create with my new scrapbooking papers too. Here is the layout I made using Pebbles pattern papers :

The circle was made by tracing around a plate and cutting it out (even though I own several tools that cut prefect circles, sometimes you just gotta go old school;). I broke up the white background by using a Heidi Swapp stencil with Twisted Citron Distress ink. The title are dies from Cheery Lynn Designs on Sweet Stamps vellum (this is the best 40lb vellum which is always on my table - so many uses).
When I saw Stuck?! challenge sketch this month I knew it would be prefect for this layout. The sketch really helped make this layout come together pretty quickly.

 Here is a detail of some of my embellishing:

The flowers are by Recolletions. The pretty green foliage is the Heart Leave Swirl die by Die-Namites which I added distress ink for depth. The Grapevine Wreath housing the journaling is a die by The Cat's Pajamas. I also added some Pretty Pink Posh sequins to brighten things up. Lastly the page's edges were distressed with scissors.

This page is entered in the following challenges:
Stuck?! Sketches  ( http://stucksketches.blogspot.com/2015/11/november-15th-challenge.html )
Sparkle and Shine Challenge 18 (http://sparkleandshinechallenge.blogspot.com/2015/11/sparkle-shine-eighteen-sponsored-by.html)
Sweet Stamps Anything But a Card Challenge (http://sweetstampsblog.blogspot.com/2015/11/monthly-anything-but-card-challenge.html)


Hope you enjoyed seeing this creation.

Monday, November 16, 2015

The Cat's Pajamas - WINTER BLOG HOP

Thanks for joining us at


Can you believe it is finally here?!  Release Day! Time to get your paws inky and join in on all this creative fun.  I have one more card to share with you as my reign as Swanky Stamper comes to a close.

I used the First Christmas stamp set and Easy Stitched Bow CutUp, and a lot of masking.
I love how Sprinkles is peeking out of the box. It reminds me of when my son had been asking for a kitten and for his birthday we had put his new kitten in a wrapped box.  She was only in there for a few minutes, but I don't think she has ever forgiven us.
Here are the new products I used:


The only thing better than new stamps and dies is new stamps and dies ON SALE and this is a GREAT sale! 

Hope you are enjoying TCP's Winter Bloghop so far. There are a lot more fabulous and adorable projects ahead.

You should have come from Brenda's blog. If not, head on over Lori's blog to start at the beginning of the hop.

Now head on over to kitty Julie and see what she has created for your enjoyment!


The Cat's Pajamas Sneaky Peek - Day 7


The big event is almost here. The Pajama Party is tonight (Monday) and right after that the new stamps and dies will be available for purchase. So get that shopping list together. See more information at the bottom of the post.

 I have one more Sneaky Peek for you. The The Cat's Pajamas will be releasing 4 new CutUps and are they fabulous!!! They include Grapevine Wreath, Leaves, Easy Stitched Bow and Poinsettias CutUps.


I used the Grapevine Wreath, Easy Stitched Bow and Leaves CutUps on my card today.

Watch Alma's Stitched Bow video on The Cat's Pajamas blog to see the different looks you can get with this die. You will be amazed. I cut the dies from DCWV foiled papers to give some dazzle. The sentiment is from TCP's Wreath Kit stamp set and stamped in brown ink. I added gems & twine on MME layered pattern papers. I think this card would be good to send to a guy, it has a masculine feel to it even with a shiny red bow.

There is still one more day for

 
- For a chance to win a $10 gift certificate to The Cat's Pajamas store, leave a comment on each of the sneak peek posts, including The Cat's Pajamas blog. A winner will be randomly drawn and will be announced on the TCP Facebook Page the following day.Here are the  Cat Pack participants today:  Nancy BrendaWendyJulieChristine and Swanky Stamper June (that's me!) 
 
And here are the details for tonight's party!

See you there,

-june


Sunday, November 15, 2015

The Cat's Pajamas Sneaky Peek - Day 6


Hope you have been having fun seeing what is coming up in The Cat's Pajamas new release!

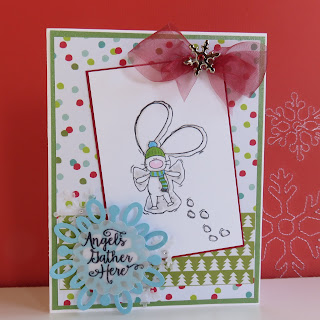
For those of you who love the long-eared bunny, TCP is bringing you a second stamp featuring this lovable character called Got Snow?

 Here, on my card, the long-eared bunny is having a ball playing in the snow. I love how this set includes the little paw prints:
This card is pretty straight forward. The Got Snow? bunny was colored with copic markers and the pattern papers are by Heidi Swapp. The blue snowflake is The Cat's Pajamas Snowflake CutUp. And the sentiment from this set was stamped on vellum with Versafine black ink and heat embossed with Ranger's clear embossing powder, then cut with a 1-1/2" circle punch. If you look close there are 3 small vellum snowflake behind the larger blue one and those are from TCP's Snowflake Lace Paper CutUp. I also add a sheer ribbon bow and silver snowflake brad on top. This card would be easy to mass produce for Christmas cards or your winter card club groups.

Here are some details you need to know:


1. All the new stamps and dies will be released on Tuesday,  November 17th.


2. Are you IN IT TO WIN IT? For a chance to win a $10 gift certificate to The Cat's Pajamas store or this stamp set, leave a comment on each of the sneak peek posts, including The Cat's Pajamas blog. The Cat's playing today are:

 A winner will be randomly drawn and will be announced on the TCP Facebook Page the following day.


3. Save the date for the Pajama Party on Monday, November 16 from 8-10pm EST. See you here.


Saturday, November 14, 2015

First Apple Harvest

I am really enjoying making cards and being a Guest Designer at TCP, but I needed a break to play with my scrapping goodies. And there is no better place than a Challenge at  My Creative Sketches (http://mycreativesketches.blogspot.com/)! Here is my take on their October sketch:


I used mostly Graphic 45 papers and fussy cut the embellishment. Thanks for taking a look.

Friday, November 13, 2015

The Cat's Pajamas Sneaky Peek Day #5

Welcome to Day #5 of 

Today we are showcasing The Cat's Pajamas Snowman Accessory Pack which goes along great with yesterday's Build Your Own Snowman set.

This cute little stamp set is prefect for making shaker snow globe ornaments. Here is what I made:
Making this ornament was easy. I stamped the globe from the Snowman Accessory Pack twice and colored them with Tumbled Glass distress ink and a blending tool. On the front globe panel I stamped just the bottom rim a second time to create an area for my sentiment. The sentiment is from the Build Your Own Snowman set and is stamped in black ink then heat embossed with clear embossing powder. A gold paint pen was used to color the rims. I then used a craft knife to cut the window (leaving enough width around the blue area for foam tape). Next I cut the entire front globe panel out. Then using Score Tape on the back I secure a piece of acetate over the opening. Then I added foam tape all around the edge of the window. Next I stamped the snowman the comes with the Snowman Accessory Pack on a separate piece of paper, colored him with Copic markers and fussy cut. I adhered the snowman and white cardstock cut like a snow slope to the back panel globe. I then fussy cut the back panel globe, leaving about 1/2" below the rim as a place for the foam tape to stick. I put sequins on top of the snowman and then carefully lining up the 2 globes I adhered them together. Then a white & gold tag was added to the back. I created the red bow with TCP's new Easy Stitched Bow CutUp. And the vellum snowflakes are cut from TCP's Snowflake Lace Paper CutUp (leftover from yesterday's project). We can't wait to add this fun interactive ornament to our tree.

Here is more fun you should know about:

-All the new stamps and dies will be released on Tuesday, November 17.


-For a chance to win a $10 gift certificate to The Cat's Pajamas store, leave a comment on each of the sneak peek posts, including The Cat's Pajamas Blog.  A winner will be randomly drawn and will be announced on the TCP Facebook Page the following day.


-Save the date for the Pajama Party on Monday, November 16 from 8-10pm EST.


See you tomorrow with more creative ideas from The Cat's Pajamas.

-june

The Cat's Pajamas Sneaky Peek - Day 4

 Wow Day 4 of The Cat's Pajamas  Sneaky Peek week. Hope you have been finding some great ideas and inspiration.
 Today's feature is Build Your Own Snowman stamp set. I love this set as you can actually be a designer and create so many looks. I started by stamping a bunch of snowmen outlines on scratch paper and just played with all the different elements. It was so fun and I was amazed with all the different characters I was creating. Once I settled on 2 I really liked, it was time to start the card

Last week Alma did a video on creating a Bokeh background on The Cat's Pajamas blog, it looked so fabulous I had to give it a try. I followed her directions, except instead of using stars as stencils I used TCP's Snowflake Lace die.
I love how it turned out, just right for snowmen. Next I created my 2 snowmen, colored them with Copic markers and fussy cut them. I really like how much personality they seem to have.
I cut a slope of white glitter paper and glued that on my bokeh background along with my snowguys. For some finishing details, I added white flock to the base of the snowmen to soften the edge and  Glossy Accents to the eyes. Lastly, I stamped & heat embossed the sentiment and attached  3 of the vellum snowflakes leftover from the stencil with gems. Here is the finished card:
Have you checked out what the Cat Pack has created with Build Your Own Snowman? Just like snowflakes, they are all so different and beautiful.
Here is the new product I used today:


And here are is what is happening over at The Cat's Pajamas:

1. All the new stamps and dies will be released on Tuesday,  November 17th.


2. Are you IN IT TO WIN IT? For a chance to win a $10 gift certificate to The Cat's Pajamas store, leave a comment on each of the sneak peek posts, including The Cat's Pajamas blog. A winner will be randomly drawn and announced on the TCP Facebook Page the following day.
Here are the other Cat Pack participants today:
Nancy Thomas
Brenda Nakandakari
Wendy McGaffey
Lori Tecler
Deborah Anton
Julie Elak
and Me!


3. Save the date for the Pajama Party on Monday, November 16 from 8-10pm EST.


See you tomorrow with another Sneaky Peek
-june, Swanky Stamper


Thursday, November 12, 2015

The Cat's Pajamas Sneaky Peek - Day 3

Welcome back to Day 3 of The Cat's Pajamas Sneak Peek.

Sneaky Peek Week
 Hope you have been enjoying all the projects so far. This release is just amazing. Today the Cat Pack and I are highlighting the irresistible Bunny Christmas stamp set. There is my card.

I started by stamping Santa bunny on white Stampin' Up cardstock, then using a brick stencil and distress ink, coloring the background. The bunny is colored with Copic markers. The top window panel is cut out of wood grain paper (by October Afternoon) and adhered it with foam squares (by 3L). I wanted it to seem like you are looking in a window or a shadow box. I stamped the scroll (from First Christmas) and the sentiment, then fussy cut it and added foam squares. I also layered in the Poinsettia CutUps and snowflakes (from the Snowflake Lace Paper CutUp) and added some gems for a finishing touch.
And here are the new products I used today:


I made this card at my monthly crop with friends. Everyone was so encouraging and excited to see how this card turned out. Nothing like good friends to bring out the fun and creativity of this craft.

Hope you will continue to join us each day through November 17th. There are so many more super stamps, dies and fabulous projects to show you. Plus...Win A $10 Gift Voucher or Stamp Set

Just comment on the Cat Pack and Swanky Stamper (that's me!) blogs each day and you could win a $10 Gift Voucher to purchase any of the products or a stamp set you see this week.
After you comment, check our Facebook page to see if you’ve won. We chose a winner at random each day.
See you tomorrow for another exciting peek.


Wednesday, November 11, 2015

The Cat's Pajamas Sneaky Peek - Day 2


Welcome to Day 2 of The Cat's Pajamas Sneaky Peek! Today we are showcasing the fabulous Wreath Kit stamp set. This set has so many options to create your own design. So fun. Here is my card:
I stamped the branch twice and layered on the berries in red ink and added Glossy Accents, then colored the leaves with Copic markers. The poinsettia is also one of the new CutUps. So pretty. After I die cut it I added red Stickles for some dazzle. I especially like the scroll stamp that comes with this set (you will be seeing it on several of my cards).
And here are the new products I used today:


Want to see more? Check out the rest of the Cat Packers for their take on this set. Comment on each of their blogs and you could win a $10 Gift Voucher. Check TCP's Facebook page under the “In it to win it” graphic to see if you’ve won.
Nancy Thomas
Brenda Nakandakari
Wendy McGaffey
June Swart (that's me!)
Christine Okken
Julie Elak